Earlier, a couple of months ago, I attempted to demystify ApplePay in this blog post. Those were the early days when most of us didn’t have access to enough information on its inner workings. Even with such limited information, many parts of the post turned out to be correct, but some turned out to be wrong too. Today, with access to more information, I am making a second attempt at demystifying ApplePay. This post is primarily a rehash of the original with only the relevant parts changed. Let’s get on with the article now…
When Apple announced ApplePay as a service on September 9th, 2014 and subsequently in their press release, they mentioned a few key terms like Secure Element, Tokens, One time unique number, Device account number, dynamic security code and such. Take a look at the 4th paragraph in their press release to see what I mean. For the layman, this could mean that apple has used some complex security technology to make ApplePay secure; but for some people in the field of mobile payments and security, it was not very clear what Apple was trying to say. So, let’s try and dissect that, shall we?
For simplicity, we are only going to discuss about ApplePay in the context of a payment made at a physical POS and not the mCommerce version of the service. This is only an educated attempt to understand the underlying implementation while the reality could well, be different.
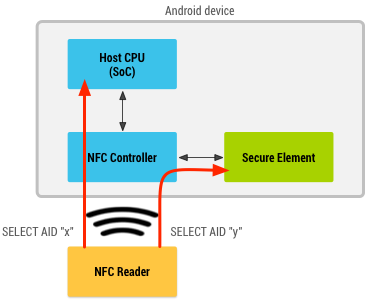
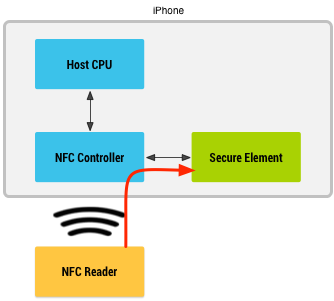
Let’s start with the Secure Element (SE). ApplePay stores the payment credentials inside the SE. It does not store them in the cloud and it does not store them within the host operating system. This means that none of the iOS apps will have access to the payment information stored within the SE.
What exactly is stored in the SE?
When, you as a customer add a credit card to your Passbook (Mobile Wallet), the simplest thing for the wallet to do would be to store the real payment credentials like the Primary Account Number (PAN) into the SE. But that is a naive implementation and Apple does not do that. ApplePay instead stores something called a token and some associated data inside the Secure Element.
What is a token?
Token is like a fake credit card number that looks and feels like a credit card number for most intents and purposes, but it is not the real deal. During transaction authorization the token would be de-tokenized into the real PAN before passing on to the Issuer for authorization. The entity that places a request to de-tokenize differs depending on the tokenization standard used. In proprietary tokenization technologies, an Acquirer would be responsible for tokenization and de-tokenization. But, ApplePay uses the latest in tokenization standard created by EMVCo. In this case, the payment network performs de-tokenization.
How is a token provisioned to the SE?
Now that we know that a Token is stored in the SE, the next step is to find out how it gets provisioned there in the first place. There are many ways in which this could have been implemented and we will not know for sure until Apple announces its implementation. But, here is an educated guess I would go with…
When a customer adds a credit card to their wallet, the PAN details are submitted to ApplePay servers. ApplePay sends the information over to the appropriate payment network (Visa, Master Card or AMEX) asking for a Token in return. In this scheme of things, the payment network is said to play the role of a Token Service Provider (TSP) while ApplePay plays the role of a Token Requestor (TR).
The TSP in turn requests the appropriate card Issuer to perform Identification & Verification (ID&V) and/or out of band validation (OOB) to verify if the card is valid, if it is in good standing and if the request is originating from an authentic customer. After receiving a successful response from the Issuer, the TSP vaults the PAN, generates and maps it to a token and returns the token and a token-key back to ApplePay’s server. This token-key will later be used to generate a dynamic cryptogram at the SE. ApplePay, acting as its own Trusted Service Manager (TSM) provisions the token, token-key and maybe other data into the Secure Element. It is the Token that Apple calls as “Device Account Number” in its press release.
What happens when a payment transaction is initiated?
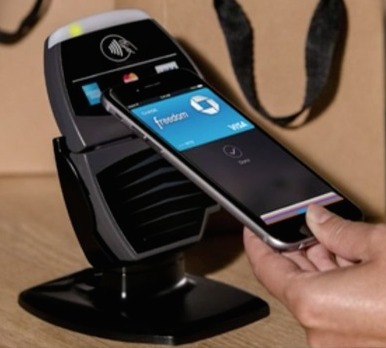
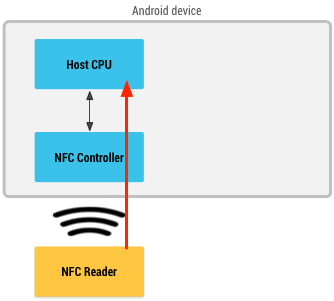
When a customer taps or waves their iPhone in front of a point of sale terminal, a payment transaction is initiated. ApplePay uses EMVCo’s Contactless suite of specifications to communicate with the contactless reader terminal. When it is time for the Secure Element to send information to the terminal, it does a couple of things. First, it identifies if the contactless terminal supports EMV Contactless or if it supports only Contactless MSD (for backwards compatibility).
If it supports EMV Contactless, the SE generates a dynamic cryptogram using a combination of the token, token-key, transaction amount, transaction counter etc. If the terminal supports only Contactless MSD, it generates a dynamic CVV instead, using similar data elements like token-key and other transactional data. Finally, it passes the token, the dynamic cryptogram (or the dynamic CVV) and other payment and chip data elements to the terminal in compliance with EMV Contactless specification.
Let’s stop for a moment here and review what just happened and compare that to Apple’s press release as quoted below.
“Each transaction is authorized with a one-time unique number using your Device Account Number and instead of using the security code from the back of your card, Apple Pay creates a dynamic security code to securely validate each transaction.”- From the press release
From the quote above, the Device Account Number represents the Token, the One-time Unique Number represents the dynamic cryptogram and the Dynamic Security Code represents the dynamic CVV.
What happens during a payment transaction?
The contactless terminal receives the token, dynamic cryptogram (or dynamic CVV) and other data elements according to the contactless EMV specification (or contactless MSD for backwards compatibility) and sends them over to the Acquirer. The Acquirer doesn’t know or care if the incoming PAN is a token PAN or the real PAN. They just identifiy the payment network based on the BIN and send it over the corresponding payment network.
The payment network identifies that it is a tokenized PAN and not a real PAN based on BIN tables. Consequently, they send a request out to the TSP to de-tokenize passing in the Token, the dynamic cryptogram (or dynamic CVV) and other transaction data elements. The TSP validates the cryptogram using the token-key that it shared earlier during the provisioning process. It also performs token channel validations and other configured domain control validations. If all the validations came out positive, the TSP de-tokenizes and returns the real PAN back to the payment network. The payment network attaches the real PAN to the authorization request and sends it over to Issuer for authorization.
The Issuer authorizes the transaction depending on the customer’s account status. The authorization response flows back from Issuer to the Payment network. The payment network removes the real PAN from the response and attaches token in its place before responding back to the Acquirer and back to the Merchant where your receipt gets printed.
In conclusion, we saw how ApplePay does provisioning and how a payment transaction is processed. For some of us this is good enough information to understand the security strategy used by ApplePay. But some others may have more questions. What happens when the Card is lost? What happens when the phone is lost? What happens when the merchant is compromised? How does ApplePay handle these challenges? These are all very good questions, but this post has already become too big. So, I will address those follow-up questions in my next post. Stay tuned!
Related Reading:
- Apple Pay – An Attempt to demystify
- Mobile Payments FAQ and not so FAQ
- Apple Pay vs Google Wallet
- What is a Contactless Chip Card?
- What is NFC?
- What is NFC Card Emulation Mode?
- What is a Secure Element?
- Who is an Issuer?
- Who is a Merchant?
- Who is an Acquirer?
- Who is a Payment Network?