Apple Pay vs Google Wallet : The Secure Element

Note: You can read all articles in this series by visiting the Table of Contents

Both Google Wallet and ApplePay are trying to solve the same set of problems – mobile payments at the physical POS and inside apps. They have many characteristics that are very similar, but they also differ in significant ways when it comes to implementation and user experience. In this series of blog posts, we will analyze a few similarities and differences one by one. We will start by talking about the Secure Element today.

A Secure Element (SE) securely stores card/cardholder data and does cryptographic processing. During a payment transaction it emulates a contactless card using industry standard protocols to help authorize a transaction. The Secure Element could either be embedded in the phone or embedded in your network operator’s SIM card. We will generically refer to them as device-based Secure Element. More recently, with the introduction of HCE technology by Google, the definition of Secure Element has been expanded to include a secure cloud as well. We will refer to them as cloud-based Secure Element.

In the beginning, Google Wallet v1.0 started its journey by using the device-based Secure Element for card emulation. This approach didn’t work out well for Google as most of the major network operators (Verizon, AT&T and T-Mobile) decided to support their own brand of wallet called Softcard (previously Isis) and blocked access to the Secure Element for any other wallet providers. Google had no choice but to move on.

se-hce-dual-ce

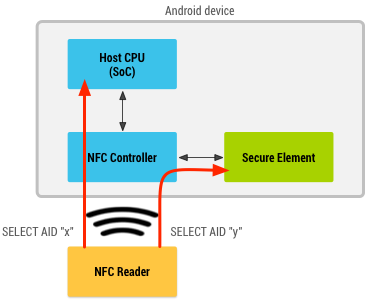
Today, Google wallet v3.0 does not use a device-based Secure Element. It uses a technology called Host-based card emulation (HCE) instead, where card-emulation and the Secure Element are separated into different areas. For example, in HCE mode, when an NFC enabled Android phone is tapped against a contactless terminal, the NFC controller inside the phone redirects communication from the terminal to the host operating system. Google wallet picks up the request from the host operating system and responds to the communication with a virtual card number and uses industry standard contactless protocols to complete the transaction. This is the card-emulation part. The transaction proceeds and reaches the Google cloud servers where the virtual card number is replaced with real card data and authorized with the real Issuer. Since the real card data is securely stored in Google’s cloud servers, the cloud represents the Secure Element part. In general, this approach is considered less secure compared to the embedded SE approach. But there are some areas (like Lost & Stolen use-case) where it is more secure. We will discuss that in a different post.

NOTE: This doesn’t mean that Android operating system does not support device-based Secure element anymore. In fact it supports both device-based Secure Element and HCE using a routing table at the NFC controller level.

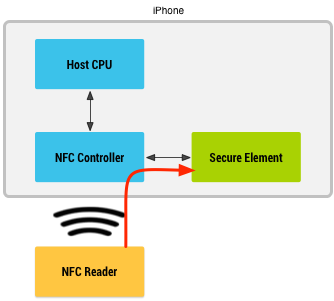
ApplePay, in contrast, works using traditional device-based Secure Element. It does not use HCE technology. Consequently, Apple does not store the real card or token data in their cloud servers at all. The on-device Secure Element essentially performs card-emulation in addition to secure storage. It sends payment data to the contactless terminal when you Tap & Pay. I have attempted to demystify how ApplePay works in one of my previous posts. In many ways it is similar to how Google Wallet v1.0 used to work (with some important differences).

se-ce-iphone

First, ApplePay does not store the real card data inside the SE. This is in direct contrast to Google Wallet 1.0 and Softcard. Instead, they store a token that conforms to EMVCo tokenization specification. It is this token (along with a cryptogram) that gets sent to the contactless terminal. During the authorization flow, the card network identifies the token, de-tokenizes them into real PAN with the help of a Token Service Provider (TSP) and sends the real PAN over to Issuer for authorization.

Second, Apple owns and controls the Secure Element embedded inside the device thereby avoiding unnecessary challenges from the MNOs.

Finally, Apple significantly simplified the provisioning model. If they had to provision the real card details, they would have to depend on a complex and convoluted process. Fortunately, they provision a token instead and took the opportunity to simplify the process to a bare minimum.

In the next post, we will discuss how these two services differ when the device is lost or stolen.

Related Reading:

Android: Remove activity from history stack

In most Android REST-Client applications, the first screen a user sees is either a Login or Registration screen. Once the user logs in, the user is generally taken to a Dashboard screen or to some other Home screen. Now, What do you think will happen if the user presses the back button? Won’t they be taken back to the Login Screen? That is not good design, Is it? The issue is no different even when we show a Blank/Splash screen while automatically logging the user in based on their saved credentials. In fact in the second case it is worse. The user gets to see a Blank screen when they press the back button.

To avoid this behavior, we have to tell android to remove the Login screen from the display/history stack once its job is complete. There are a variety of ways to do this. The easiest way is to give the LoginActivity a “android:noHistory = true” attribute in the manifest file. That instructs Android to remove the given activity from the history stack thereby avoiding the aforementioned behavior altogether.

<manifest xmlns:android="http://schemas.android.com/apk/res/android"
          package="com.example.activity"
          android:versionCode="1"
          android:versionName="1.0">

  <application android:name="MyApp" android:label="My Application">

    <activity android:name=".LoginActivity" android:noHistory="true">
      <intent-filter>
        <action android:name="android.intent.action.MAIN"/>
        <category android:name="android.intent.category.LAUNCHER"/>
      </intent-filter>
    </activity>

  </application>
</manifest>

In other similar circumstances, we may want a similar but dynamic behavior where we would like to choose at runtime, if an activity should be removed from the history stack or not. In those cases we can use Intent.FLAG_ACTIVITY_NO_HISTORY intent flag to achieve the same feature dynamically.

There is a cornucopia of other Intent flags available and documented here for our usage pleasure. They may render themselves useful under other circumstances. Have fun learning them all…

Tomcat & IntelliJ – Deploy war files outside webapps folder

At present I am working on developing an Android application that needs to be supported by a slew of REST services hosted in the cloud. I chose Google App Engine based on its support for Java, Groovy and most importantly Spring. I developed a Spring MVC based REST application and used ContentNegotiatingViewResolver to negotiate content based on request URL extensions. For example, an XML response will be returned if the request URL ends with .xml, a JSON response for .json and an HTML response if he URL doesn’t have any extension. Don’t get me started on Accept Header versus URL extension based content negotiation. That is a rant for another day.

I was attempting to Serialize a Map<Enum, List<Model>>. All was well and I was able to retrieve both HTML and JSON representations, but when I tested retrieving the XML representation, JAXB complained that it cannot handle a Map instance in the root although Jackson was totally cool about it. As usual, Googling revealed that JAXB expected a Container class at its root which I didn’t want to create. I didn’t want to give up either. So, I tried my luck using XStreamMarshaller. This time GAE complained that XStream used a restricted API. WTH?

Just out of curiosity, I wanted to check if XStreamMarshaller would work as expected when used outside of GAE. So, I created a Tomcat context file “myapp.xml” with the following definition and carefully placed it inside TOMCAT_HOME/conf/Catalina/localhost. I could have just started Tomcat from TOMCAT_HOME/bin/startup.bat to check if it works, but being an IDEA addict, I created a Run Configuration for the IDEA Tomcat plugin and started the server from inside IDEA. But the app refused to even be discovered, let alone be deployed. After a few frustrated attempts, I tried starting Tomcat directly outside IDEA. Thankfully the app got deployed successfully and to my surprise, the XStreamMarshaller skillfully streamed out the serialized XML. Problem Solved!

<?xml version='1.0' encoding='utf-8'?>
<Context docBase="PATH_TO_MY_APP"
         reloadable="true"
         path="/myapp">
</Context>

But, why didn’t the app get deployed when I started Tomcat from inside IDEA? After all, I have linked IDEA to my local Tomcat installation and the script it executes is clearly in my TOMCAT_HOME/bin folder. Then, why why why in the world does the app refuse to be discovered? The solution came in the form of CATALINA_BASE. It seems that IDEA copies the contents of TOMCAT_HOME/conf folder into its HOME folder with some name like Unnamed_MyApp and sets this folder to be the CATALINA_BASE. That explains why “myapp.xml” is so totally ignored by Tomcat. Then, I navigated to “Tomcat Run Configuration -> Startup/Connection -> Environment Variables” and added CATALINA_BASE as an environment variable and pointed it to your local TOMCAT_HOME folder. After this configuration change IDEA started Tomcat as expected and my app was both discovered and deployed. Another Problem Solved!

But the real problem – JAXB complaining about Map and GAE rejecting XStreamMarshaller as restricted – is yet to be solved. Maybe I should try one of the CastorMarshaller, XmlBeansMarshaller or JibxMarshaller.

Any ideas?

Android: List View alternating between 1px and 2px dividers

Have you faced a problem with Android ListView where the dividers alternate between 1 pixel and 2 pixel thickness although you have specifically styled it to 1px? I am sure many have, but for some reason they seem to ignore it. I say this because I noticed this problem in quite a few apps in the market. When I found the same problem in one of my apps, I decided to fix it although it was not at the top of my priority list.

1px_wrong

The first solution I came up with was more of a work-around. Instead of using a 1px divider line, I tried using a 1px thick image as @drawable. It worked out surprisingly well on my HTC Desire but was not without its own problems. On low-end android phones the dividers started to blink when the user scrolls the list. Sometimes they disappeared and never re-appeared. I guess it is some kind of a refresh problem. I even noticed this kind of behaviour in a few market apps. So, that approach didn’t work out very well…

Then after quite a bit of fiddling around, I found out the root cause of the problem. My app was running in compatibility mode!!! Man, how could I have not noticed that? Anyway, when I tried setting the minSdkVersion in my android manifest to version 4 and the targetSdkVersion to the version 8 the problem disappeared completely. I could now use a plain 1px divider line and there were no problems.

1px_right

  <uses-sdk android:minSdkVersion="4"
          android:targetSdkVersion="8"
    />

I just thought of sharing it with the world just in case someone runs into the same road block…

iPhone SDK – Initial Thoughts

I have been following iPhone since its inception. Initially, when Steve Jobs revealed that there was not going to be any developer SDK, I was just one of the millions to be really upset. Then, one fine day the iPhone SDK was released, the now infamous App Store was released, all are happy and the rest is history. I did try out some examples immediately after the SDK was released but then got busy with other interesting stuff (like trying out a startup) and didn’t focus much on it – until recently.

A few months ago, my company picked me to get trained on the iOS SDK. Five days of Objective-C and XCode and Interface Builder later, I was coding for the fifth mobile platform in my career. I initially started with BREW, moved on to J2ME (now Java ME), then Blackberry (includes J2ME), then into the Bold and Beautiful Android and now into iOS.

I cannot help but compare my Android experience with iOS. Coming from a Java background, it should not be a surprise that I will be comfortable with Android SDK than with the iOS SDK. Even when that is the case, I feel that the iOS SDK and its tools is not all that developer friendly compared to Android. Apple has created the best layman products ever but they are quite bad at creating developer products, I guess.

Objective-C as a language is a lot more difficult to master than Java. The complex memory management gymnastics, multiple files to define one class and weird method definition syntax are just a few of my gripes. XCode 3.x is a hell to work with at least from an Eclipse/Netbeans/Idea user perspective. Why should I have to move between two applications called XCode and Interface Builder to develop one iPhone app? Why can’t I develop in Windows or Linux if I want to? Why doesn’t the debugger work well most of the times? Why isn’t Garbage Collection part of the language? Why isn’t incremental compilation available? These are just a few questions that come to my mind when I develop for iOS…

That said there are quite a bit to like about the iOS platform as well. Objective-C has some cool features like id type, protocols, named parameters and categories that I would have loved Java to have. I keep hearing from people that once you deploy an iPhone app in the App Store, the benefit in terms of payback is good enough to justify the pain. Interface Builder is very good at what it does compared to the equivalent Android designer. XCode 4.x vastly improves the development experience by integrating Interface Builder tightly.

Although both iOS and Android are vastly different platforms, they are together ruling the world today. As developers we don’t have a choice other than learning and working with these heavenly beasts until the cross-platform world for mobile (like PhoneGap, Titanium, Rho Mobile etc) matures

Android: My HTC Desire

I bought an HTC Desire few months back and I am loving it. It is powerful, has froyo, Wifi Hotspot, Voice to Text, a powerful Swype Keyboard (I bought it), AMOLED display, excellent applications and looks pretty cool too. I even bought an expensive Piel Frama case for it.

Got a few gripes though. It’s battery doesn’t last a whole day with 3G or WiFi switched on. So, initially I had to manually switch back and forth a couple of times to get through the day. After I bought another USB charger, exclusively for office, that problem is kind of solved.

Another issue is its internal storage. It just has 512 MB of internal storage and I frequently keep receiving the “Low space” notification and froyo’s official APP2SD is not of much help. After I rooted my phone and installed the unofficial APP2SD, that problem is also kind of solved. Further research revealed that with some more geeky stuff I can make Android think of my SD card as internal memory. Haven’t tried that yet though… Will keep my blog updated when I succeed.

I have another minor issue too. I use todoist regularly to manage my tasks and I couldn’t find any one good todoist android app. There are quite a few unofficial and buggy apps but they are just not usable to say the least. I guess this is a problem I can solve myself. I am thinking of writing my own todoist client for android. Let’s see how this works out… Again, will keep my blog updated on the happenings…